

Confetti Crayon Drip Pumpkin
Supplies:
- Small Pumpkin (any color will work)
- Crayons: colorful or all red for blood effect
- Lighter or Candle
- Possibly Paint for pumpkin (if you prefer a base color)
Begin by peeling the paper from the crayons. From my experience the generic brand melts more easily than the name brand. I chose an array of colors because the rainbow made me happy. You could choose a color scheme to match your room decor or choose red to make a fake blood look. As an afterthought, I decided using glitter or metallic crayons would yield an awesome result as well.

Next, I held the peeled portion of crayons over the open flame to heat them and then allowed them to drip over the candle. Take caution not to burn yourself while doing this particular part. The crayon wax itself can burn your skin as well. I alternated colors as I felt like it.

The end result truly resembled confetti. These would be a perfect table centerpiece if you have an October birthday!

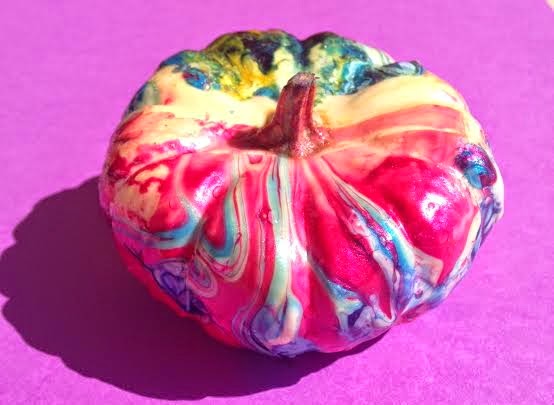
Marbled Pumpkin
Supplies you'll need:

- Nail Polishes (I used the remnants from older ones.)
- Small Pumpkin
- Disposable Bowl
- Toothpick
- Warm Water
First off, you fill the bowl with luke warm water. Be sure to fill only 75% of the bowl to allow for displacement when the pumpkin is dipped later.
You then take the nail polish and drizzle it on the surface of the water. It is best to make the swirls as you drizzle but if that doesn't work you can run across it with a toothpick. The polish will partially adhere to the toothpick but will allow for swirls. It is fun to play with the designs a bit and try different color combinations.
You then take the nail polish and drizzle it on the surface of the water. It is best to make the swirls as you drizzle but if that doesn't work you can run across it with a toothpick. The polish will partially adhere to the toothpick but will allow for swirls. It is fun to play with the designs a bit and try different color combinations.

Next you dip half the pumpkin in the water. As you pull it from the water, you will have a marbled design. You can either leave that to dry as is (with half marbled) or make another design and dip the other half. You will need to allow these to dry in a well ventilated area due to the fumes from the polish.

Blow Dryer Drip Crayon Pumpkin
Supplies:
- Pumpkin (I used a white one)
- Package of Crayons
- Blow Dryer
- Tacky Glue
- Pencil
- Box or craft paper (to protect surface from the wax splash)
My favorite of all the colorful pumpkins was this gem! It is a fun art project on a canvas as well. I unwrapped the crayon paper and broke the crayons in half. I had previously marked the 12 places evenly around the stem with a pencil to space the crayons evenly.
I then took the crayons and glued them onto these lines using Tacky glue. I allowed this to partially dry for 10 minutes.


My next step was to place the pumpkin on a piece of scrap cardboard that I had. I then aimed the blow dryer over the crayons and waited for them to melt. I guided the drips with the air from the blow dryer. For some odd reason the yellow crayon melted quicker than the others.
The end result was fabulous: my very own rainbow drip pumpkin. For a scarier look, you could use red crayons and add a fake butcher knife to the mix. It would give a great bloody effect.


No comments :
Post a Comment